Two Weeks Out: 5 Event Brand Collateral Items Planners Should Prioritize

Two Weeks Out: 5 Event Brand Collateral Items Planners Should Prioritize
Event brand collateral is every branded item, printed or digital, that represents your company at an event, from the backdrop behind your booth to the follow-up email you send three days later. If you’re staring down a checklist with two weeks until doors open, prioritize a large banner or backdrop, one clear one-pager, business cards, a landing page, and one memorable swag item. Everything else is negotiable. The rest of this guide explains how to design, produce, and actually measure whether any of it worked.
TL;DR:
- Prioritize large-format signage that communicates clearly from a distance and maintains visual consistency across backdrop, banners, and signs.
- Use a single, focused message on all collateral, ensuring headlines and visuals are locked early in the process to prevent design drift.
- Allocate at least several business days for printing and merch production, ordering 10% extra to account for damage or last-minute needs.
- Track collateral effectiveness by assigning unique QR codes or links to each piece, enabling measurement of engagement and conversions.
- Organize all design files and assets systematically in cloud folders with version control to ensure smooth vendor handoffs and consistent branding.
Table of Contents
- What Counts as Event Brand Collateral?
- How Do You Prioritize Collateral by Event Goal?
- What Design Rules Keep Collateral Consistent?
- How Long Does Event Collateral Production Take?
- How Do You Track Whether Collateral Actually Worked?
- How Should You Organize Files for Handoff?
- What a Design Partner Notices About Event Collateral
- Get Your Event Collateral Built by a Design Partner
- Helpful Resources for Building Event Collateral
- Sources
- FAQ
What Counts as Event Brand Collateral?
Event brand collateral splits into four buckets, and most teams overinvest in one and neglect the others.
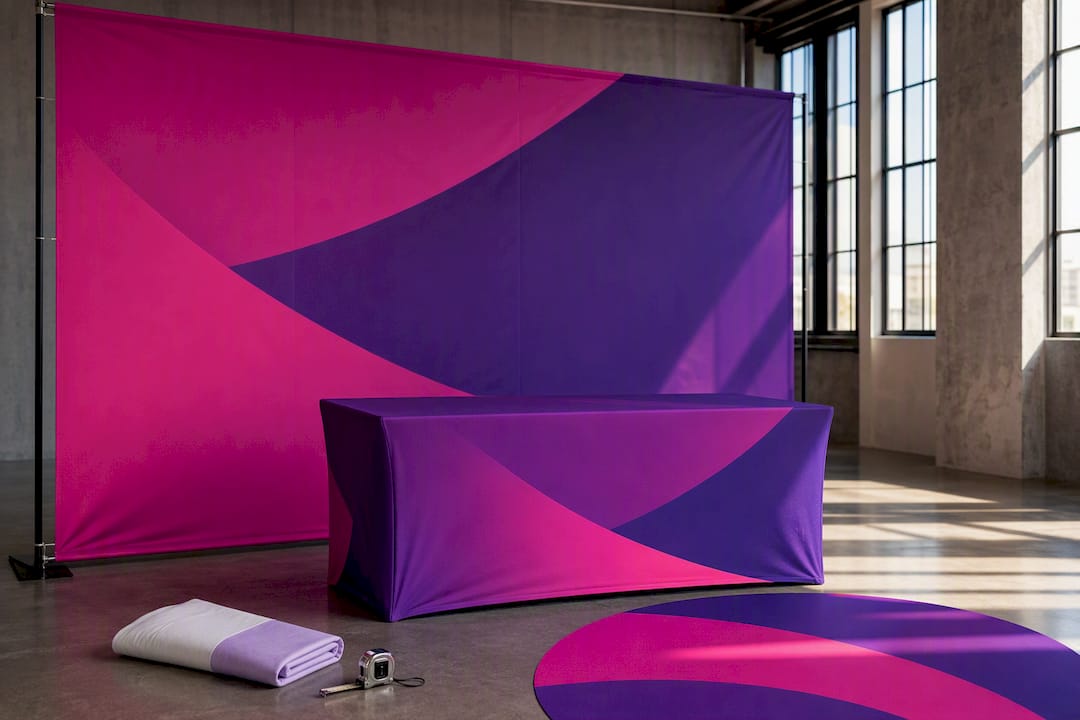
Large-format visibility pieces do the heavy lifting for foot traffic. Banners, booth backdrops, directional signage, and photo walls need to read clearly from a moderate distance away, which means bold color blocks and minimal text. APM Printworks notes that large-format printing works best when it builds a consistent environment rather than standing alone, so your backdrop, table throw, and floor decal should share one visual language.
Printed leave-behinds are where most events lose their message. A brochure tries to explain everything; a one-pager forces you to pick the single thing worth remembering. Business cards still matter, but only if someone actually wants to follow up. Choose one-pagers over brochures whenever your offer needs a single clear hook rather than a full product tour.
Promotional items should match how the recipient will actually use them. Custom Ink points to drinkware, totes, and tech accessories as the categories that outlast the event itself.
- Large signage: backdrops, banners, directional signs, photo walls
- Print leave-behinds: one-pagers, brochures, business cards
- Swag: drinkware, totes, tech accessories, apparel
- Digital assets: landing pages, email templates, social graphics, slide decks
- Activation props: badges, tickets, interactive experience pieces
Digital assets round things out: a dedicated landing page, an email sequence, and a slide deck that matches your booth’s visuals instead of looking like a separate company.
How Do You Prioritize Collateral by Event Goal?
Not every event needs the same stack. Match collateral to what you’re actually trying to accomplish, then build backward from there.
- Awareness goals call for signage, social graphics, and a memorable swag item that travels beyond the venue.
- Lead capture goals need a scannable badge or QR code, a one-pager with a clear next step, and a landing page built for the follow-up.
- Demo traffic goals depend on directional signage pointing to your booth and a slide deck that can run unattended on a loop.
- VIP relationship goals favor a higher-quality leave-behind and a small, better swag item reserved for that group.
Get Clatter finds that combining pre-event digital assets with in-venue print and post-event follow-up produces stronger results than leaning on any single stage. Pre-event, prioritize invitations, the landing page, and email/social teasers. During the event, prioritize visibility, badge or lead capture, and your one-pager. Post-event, prioritize the follow-up email and fulfilling any swag you promised on-site.
What Design Rules Keep Collateral Consistent?
Before anyone touches a design file, lock three things: your color palette, your approved fonts, and exact logo placement rules. Write these down. A one-page style guide prevents the drift that happens when three people design three pieces in three different tools.
The single-message rule matters more than most teams admit. Sembark’s event branding playbook frames collateral around three jobs, attract, explain, and recall, and argues that a bold, focused headline beats a crowded one every time on a busy show floor.
- Large-format text should be sized for clear readability from typical viewing distances
- Small-format text should remain legible in printed materials
- Maintain sufficient contrast between text and background for readability
- Prepare files using appropriate color modes and resolution for print and digital media, including suitable bleed margins
- Icons and type should stay legible for readers with low vision, not just designers with perfect monitors
Pro Tip: Design your backdrop headline first, then build every other piece around it. If the one-pager and the banner don’t share the same core sentence, you don’t have a message. You have a paragraph.
How Long Does Event Collateral Production Take?
Print and merch timelines are the most common reason events launch with half their materials missing. Standard large-format printing typically requires several business days; rush services can speed this up at an additional cost. Standard swag orders generally take multiple weeks to complete, with longer timelines for custom tooling, like a molded item with your logo built into the shape rather than printed on it.
Budget shapes roughly into three tiers. A lean setup runs paper one-pagers, a vinyl banner, and a basic tote. A mid-tier setup adds a printed backdrop, better drinkware, and a small run of branded apparel for staff. A premium setup includes custom-tooled swag, a full backdrop-and-floor-decal environment, and higher-stock printed leave-behinds.
- Confirm bleed, color mode, and resolution before sending files to print
- Order 10% extra on any printed run to cover damage or last-minute staff additions
- Choose a local vendor when you’re inside two weeks of the event; go national for cost savings when you have a month or more
How Do You Track Whether Collateral Actually Worked?
Collateral without a measurement plan is just decoration. Every printed piece with real estate to spare should carry a QR code or a unique link, and each one should point to a slightly different offer or landing page so you can tell which piece actually drove the click.
- Assign a distinct UTM link or QR code per collateral piece, not one generic code for the whole booth.
- Track scans, landing page visits, form completions, and booked demos separately for each source.
- A/B test two headlines or offers across identical banner placements if you’re running multiple booth locations.
- Log swag fulfillment promises (mailed items, sizing follow-ups) so nothing slips through after the event ends.
Trackable links turn collateral into a measurable channel instead of a guess. APM Printworks recommends adding QR codes to large-format pieces specifically because they’re the easiest place to capture attention and direct it somewhere trackable.
How Should You Organize Files for Handoff?
Vendors and designers need the same handful of file types every time: vector EPS or AI files for anything getting printed large, high-resolution PNG or JPG for digital graphics, and PDF with embedded fonts for anything going to a print shop.
Keep a simple folder structure. Something like Event_Name / Print / Digital / Swag / Fonts_and_Colors prevents the scramble that happens when a vendor asks for a font file two days before your event. Your design asset management practices should include version control so nobody prints an outdated logo.
A vendor handoff package needs the master files, your locked color codes (Pantone or CMYK), font files or licenses, and a one-page spec sheet.
- Master brand files (logo, color codes, fonts)
- Print-ready files at correct resolution and bleed
- Digital files sized for their specific platform
- A signed-off proof from whoever owns the brand
- A cloud folder link the whole team can access, not a single person’s laptop
A cloud folder with clear naming beats a scattered inbox of email attachments every single time, and it’s how managing design assets for a growing startup actually holds up under event deadlines.
What a Design Partner Notices About Event Collateral
Booths that commit to one bold message consistently pull more foot traffic than booths trying to say five things at once. That’s not a hunch. It shows up project after project once a client narrows the headline down to a single sentence instead of a paragraph. Marketing teams that collaborate well with a design partner tend to share one habit: they lock the message before they touch layout. Coumba Win’s own brand identity checklist reflects that same sequencing, and it’s worth applying to your next event stack before a single file gets sent to print.
— Coumba Evelyn
Get Your Event Collateral Built by a Design Partner
Coumba Win Design builds event brand collateral the way a startup actually needs it: fast, consistent, and tied to a style guide you can reuse for the next event without starting from scratch. Rather than piecing together a banner from one vendor, a deck from a freelancer, and swag from a catalog nobody vetted, you get one design partner locking the message, the colors, and the files together from the start.
That includes Demo Day kits with branded swag and booth materials built for founders who need everything ready before a room full of investors shows up. If your team is drafting a style system to keep every future event consistent, the Style Guide service locks your colors, fonts, and logo rules once so nobody has to guess again. Teams that need faster turnaround on repeatable assets can also lean on the Components library for templates built to scale across events. Visit Coumba Win Design to request a quote on your next event kit.
Helpful Resources for Building Event Collateral
For quick asset creation, Canva offers templates and layout tools that speed up pre-event design. For swag sourcing, Quality Logo Products breaks down promo categories by budget and audience. For step-by-step planning, Sembark’s branding playbook and visual storytelling guidance from BabyLoveGrowth round out the practical side.
Sources
- Top tips for preparing event collateral, merch, and social media assets — Canva
- Promotional Products — Custom Ink
- A step-by-step event branding playbook — Sembark
- 12 essential marketing materials for events — Get Clatter
- Event marketing collateral: A complete guide — APM Printworks
FAQ
What Does Event Collateral Mean?
Event collateral refers to all the branded materials, print, digital, and promotional, used to represent a company at an event, from signage and one-pagers to swag and landing pages.
What Are Some Examples of Brand Collateral?
Common examples include business cards, brochures, banners, backdrops, branded apparel, drinkware, presentation decks, and email templates, all built around one consistent visual system.
What Does Collateral Mean in Branding?
In branding, collateral means any supporting material that carries your visual identity into the world, whether that’s a printed flyer or a digital social graphic, reinforcing the same logo, colors, and message wherever it appears.
What Are the Five P’s of Event Marketing?
Definitions vary across sources, but the version most planners use covers Purpose, People, Product, Promotion, and Place, five factors that shape how an event’s marketing materials get planned and distributed.
How Far in Advance Should I Order Event Signage?
Standard large-format printing typically requires several business days; build in extra time if you’re also waiting on custom swag with a longer production cycle.